Child's Play: Writing a Software Renderer in Rust
11 April 2023
It's not actually that hard!
(tldr check out my list of vetted introductory graphics resources)
So, I'm finally getting around to writing up what it is I actually spent the past three months at Recurse working on. For the most part, I've been dabbling in graphicsey stuff in Rust, and it's been an absolute blast! Well. Mostly. Except for the whole part where nearly everything in Rust graphics world is pre-1.0 release and therefore often limited-scope and buggy. And the part with all the Wayland- and Linux NVIDIA- specific bugs in common low-level graphics crates, causing me at one point to give in and install i3 (an X11 WM) just to get nannou running at all. Aand the part where I still can't get WebGPU, the shiny new browser graphics API, working in Firefox Nightly or Chrome Canary on Arch.^
But we're not here to talk about any of that today! Instead, I'll bring you back with me to late January. Back before I had ever heard of "padding my buffers" (. . .) or encountered 'Error in Surface::configure: parent device is lost' (. . .) or seen deeply nested closures used to recreate the CSS box model in Rust (. . .).
No, for today we're going back to the "childlike delight" stage of my new hobby. Shortly after writing about how much I missed math, but was entirely unsure what kind of "math" I wanted to be doing, I discovered this video by Freya Holmér on splines and was like "oh, cool, making pretty pictures happen on screen involves lots of math. Let's do that!"
baby's first MVP (model view projection)
For my first Rust project and my first graphicsey project, I decided to write a software renderer. I was inspired by this fantastic series by youtuber javidx9 on creating a 3D graphics engine using C++, Visual Studio, and the Windows console. I had no interest in learning C++ or reinstalling Windows, however, so I decided to port the engine to Rust.
a lesson in choosing your degrees of freedom (potential sources of bugginess)
Porting an existing codebase was a very good first project! Graphics is hard. I was coming from the web development world primarily, where the browser does a lot of the heavy lifting for you in so, so many domains, from memory management to multiplatform support to "how render font" (a perhaps surprisingly difficult problem!). Picking up Rust is also hard if you're coming from exclusively high-level languages; you have to spend a while macerating in borrow-checker soup to get any sort of intuition for Rust's memory model. Choosing a project where I had a source-of-truth for what something should look like was extremely helpful; it helped narrow down which bugs were due to (my incomprehension of) which tech.
javidx9's series has WIP files on github for each video, which was invaluable in making sure my renderer was having the "right" issues at each point in its iteration. Graphics programming generally involves a "pipeline" with various coordinate systems and transformations/calculations associated with each step in this pipeline. For an experienced graphics dev, it's often evident what stage the issue is happening in based on what the symptoms are: screwy shapes = vertex or projection issue, screwy colors = fragment or lighting issue, to drastically oversimplify. For a newb, it's difficult to figure out what each phase even does spatially, let alone figure out which stage is causing which problem. So, a project where there was a well-defined SOT was invaluable.
shaders are cool and also they are hard
javidx9's series was also fantastic because it ignored much of the tech that makes graphics programming powerful and also notoriously difficult to learn --- talking to the GPU --- in favor of explaining how 3D rendering works conceptually. By making a software renderer, I got to learn about the basics of 3D graphics --- model/world/view/clip coordinates, projection, clipping, cameras, z buffers, light sources, painting textures --- without having to worry about the particularities of talking to the GPU. Programs that run on the GPU (aka shaders) are notoriously difficult to debug for important performance-related reasons; building an intuition for how this stuff "works" while the Rust compiler had my back was very helpful for when i moved on to shader programming and had fewer print statements to rely on.
But simultaneously. . .there's, like, a reason people made GPUs, lol. There are only so many performance gains to be made and only so many vertices one can render when using the CPU exclusively to carry out all the many calculations required to paint a 3D frame. The renderer I wrote is moderately performant only for low-poly .obj files; if I eventually add in textures, it will be even less performant. Writing a software renderer was both very satisfying and also not something I can seriously build on after a certain point.
ok but like. what is it. how does it work
what follows is a very high level overview of what my engine implements, glossing over some details. if you're here more for a list of stuff that I found helpful, scroll to the end!
first things first: stuff i didn't do
I decided I did not want to deal with implementing "make window happen cross-platform" or "listen for user keypresses," so I used minifb for that. Winit seems to be the standard for Rust, but at the time its current release had a NVIDIA-Wayland bug that required patching manually, and I decided I'd just use a crate that worked as-is, thanks.
Controversially perhaps, I also decided I did not want to deal with figuring out how to draw a line between two points. (If that interests you, check this project out!) I messed around trying to get several Rust graphics crates hooked up (there are a LOT to choose from), but raqote's API was simple and it can draw lines real good, which is what I needed. If you're trying to decide which graphics crate to use, first of all--- good luck! there are so many! Second of all maybe take a look at this post if you're doing something serious, it's got a good overview though it's a couple years old. Also, this github readme. Also, this reddit thread. Like I said, there's a lot! (Trivia: One of the core people behind piet is a Recurser I recently learned, which is pretty cool!)
so we've got a window and a framebuffer. now what
Oh, you know what's next! It's triangles time baybee!
Turns out that if you can draw triangles that form a rotating cube, you're like, halfway to implementing skyrim.^ The math is roughly the same because almost everything in computer graphics is represented as triangles, points, and lines, which was kinda shocking to me originally tbh. Ok, probably there are huge exceptions to this rule but polygon-based rendering is extremely common.
So, you've got a list of triangles representing a shape (say, a cube), stored in an .obj file as a simple list of vertices and faces. And you'd like them to show up on a screen and resemble that shape (say, a cube). Unfortunately for you, the cube is represented in three-dimensional space (it's a cube, not a square!) and your screen is two-dimensional. So, we
project to 2D
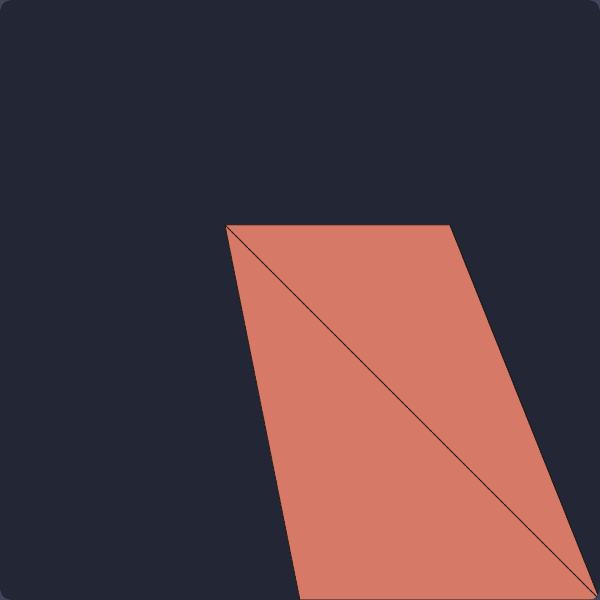
So, that looks pretty nice. Two obvious problems, though: the cube isn't centered very well, and you can't actually tell it's a cube. From the angle we're at, it looks like more of a square. Wouldn't it be nice if we could change where we're positioned with respect to the cube, so we can get a nice viewport? We could even use a nifty name for the matrix math we use to get there, something intuitive, maybe
a camera system

Ahh, that's more like it! I don't feel like going into the math, so here is a great link if that's what you're into. TLDR-- in the real world, you generally move cameras around the scene to get different viewing angles, look at different objects, etc. With this engine (as with many others), you actually do the reverse -- you "move" the vertexes representing your scene around the camera, defined at the origin of this coordinate system, to "look at" different parts of the scene. You define where your camera is (the origin), which direction you're looking, how near and far you can "see" objects, and a frame of view -- and then rotate the world so its coordinates are relative to this coordinate system. I promise it makes more sense with the math!
So this is great. Except....Things look a little flat, don't they? Every face of the cube is shaded the same. In the real world, things look a little more dimensional. To get that dimension from our engine, we'll have to add in some
light
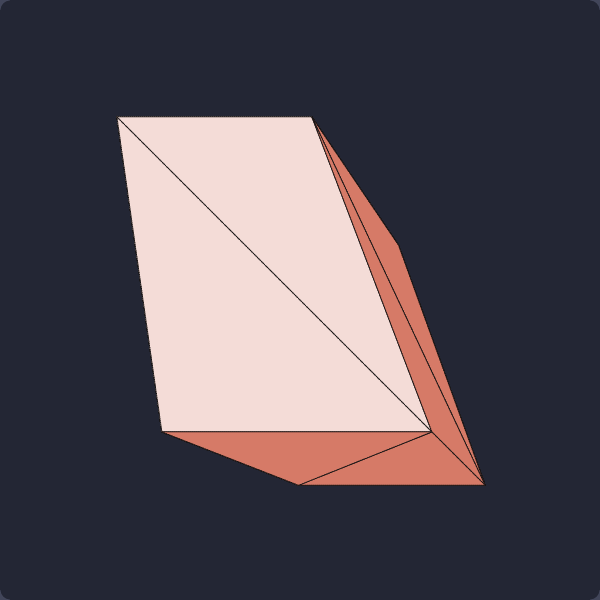
Okay lol, so that doesn't actually look fantastic, but we're getting somewhere! The lightsource here is modeled as a uniform directional light "behind" the camera, so it's adding light based on how much this lightsource is "shining" on the surface. This calculation is done using normal vectors to each triangle's surface, producing "flat" shading with a basic directional light. A more realistic form of shading for round surfaces could be implemented by using the normal at each vertex and interpolating across them for each triangle face, and a more realistic one by taking into account the width of a potential lightsource rather than modeling it as a single vector. If you're excited by that math, have another link to some fun different lighting strategies.
Okay, so we're looking pretty good! Let's try and graduate to something a little more complex. Say. . . a spaceship? Nabbed directly from the excellent javidx9 series github?
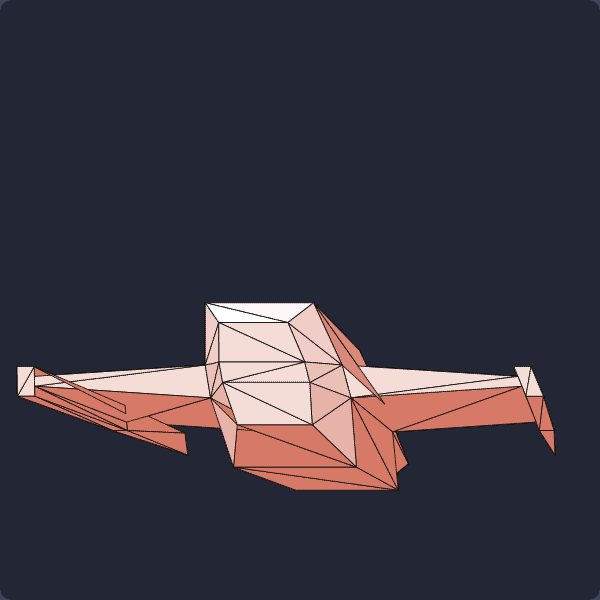
Alright alright. So our light source is definitely working. But clearly we've got some new problems. If we take a look at the wings of our spaceship, you see all sorts of chaos. There are a few things still off about this engine, so we'll take them one at a time.
z-buffer ordering
One of the things causing the weirdnesses seen above is the fact that we're not drawing our triangles in any particular order at the moment. Our engine draws all triangles at whatever order they're fed into it by the code. As it is, a triangle waaay at the "back" of the spaceship (aka one with large z-values in view space) can be drawn after a triangle at the "front" of the spaceship, replacing its pixels with its own and causing weird artifacts such as the one seen on the left wing.
Z-buffer ordering algorithms in modern GPUs have to be relatively sophisticated (consider if triangle A is "in front" of half of triangle B, but "behind" the other half of it?), but for now we'll stick with ordering by a simple average of Z-values. This gets us something a lot nicer looking:
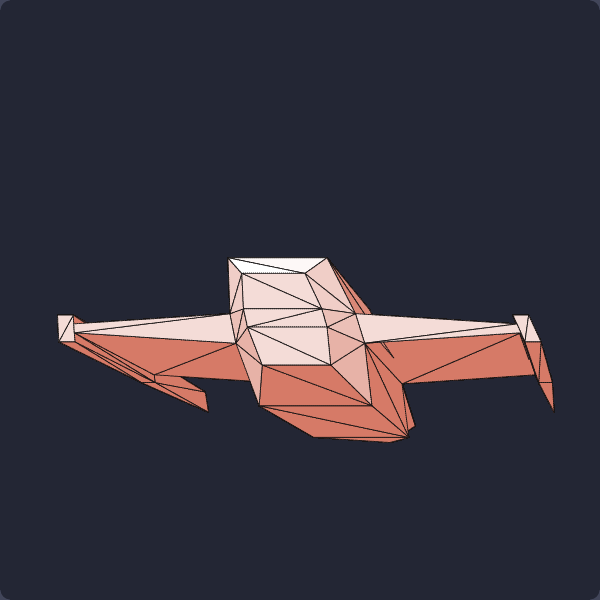
A lot better. There's still one triangle on the right wing with the issue mentioned above, where half the triangle should be rendered "above" and the other half "below" another triangle; but this is looking a lot better.
Let's take a closer look, to make sure everything is actually working as intended.

Haha. Oh no
clipping
So, what's happened here is actually not that complicated, though it's a slightly more sophisticated fix than simply re-ordering our triangle painting.
The first thing you'll notice with the engine at this point is that it starts sloooowing down as you (the camera) get closer to the polygon. One day I'll do a WASM port and update this post so you can see for yourself, but for now, imagine about 1 frame per second update rate.
When an object goes off screen or gets too close to the camera, the matrix math we're currently using means that the object's coordinates get verrry large. For objects close to the camera, the reason behind this is pretty intuitive. Hold your hand up directly in front of your eyes. Hopefully, your hand looks big. Now put your hand behind your head. How big does your hand look? "What kind of question is that," you say, "I can't see it!"
Same goes for the view matrix, albeit in a math-ey way - objects too close to or behind the camera have unwanted behavior. In the process of projecting the triangles, you divide by their z distance from the camera. When this z distance gets very small, the numbers get very large, and it's a lot slower to do tons of calculations on very large numbers. (This is where you start to get memory problems as well, which for this program manifested in crashes due to attempted overflow of f32s.) Also - why should we even be doing calculations on vertices that are off-screen anyway?
This is where clipping comes in. We only want to be rendering things that are within our view volume. But in order to do that, we'll have to do a bunch of math, because currently all we can render with our engine is triangles. What do you get when you chop a triangle with a plane or two?
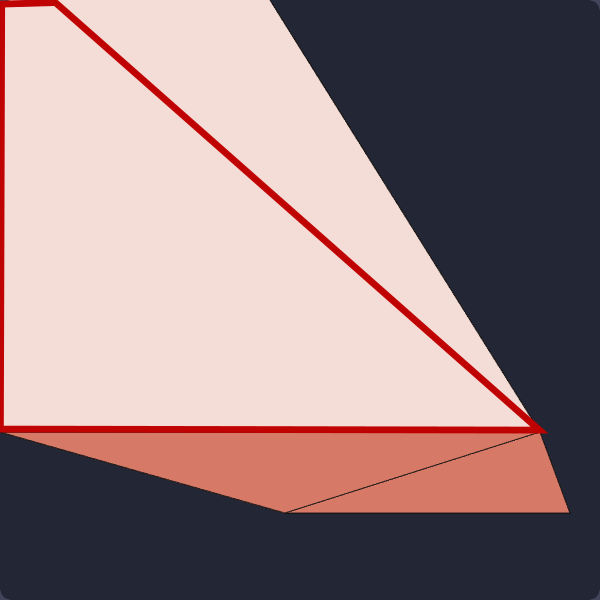
not a triangle
Again, I'm skipping over the math, but there are several algorithms you can use to detect whether a vertex needs to be clipped and then turn the remaining vertices into new triangles by adding vertices to the mix. The math can be found here, if you're interested. Let's see how things are performing with clipping for both the front view plane (close to camera) and the window edges:

There we go! We're back to triangles, and our performance issues have disappeared -- our application is positively snappy.
final touches
As a final touch, let's render something a little fancier. Mesh courtesy of Stanford:
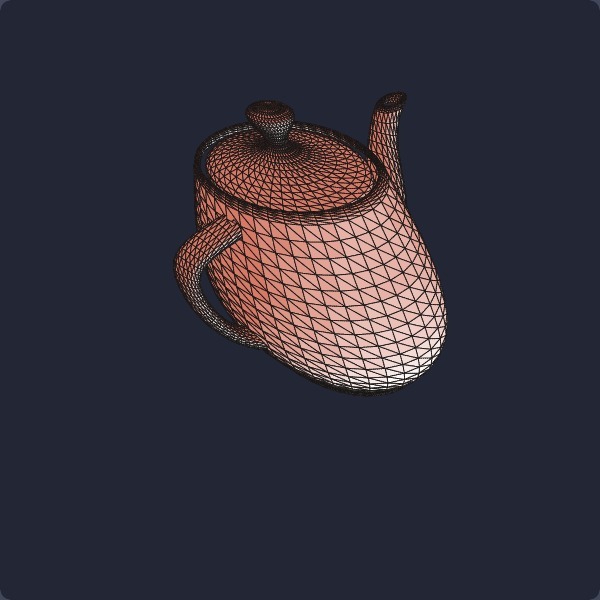
and to really seal the deal, I'll turn off the polygon lines, add a little rotation, and get you a gif:

Beautiful! We've still got a few glitches around the corners and the lid, but that looks about right. ~cue fanfare~
shortlist of absolute beginners' graphics resources i enjoyed
In making this engine as well as starting out with GPU programming, I ran through a bunch of different resources. Some were helpful. Some were less so. Here's a roundup of the ones I can remember in this moment!
javidx9
the original javidx9 series that got me started. all his videos are really great!
Computer Graphics From Scratch
alternately - Computer Graphics From Scratch I've heard great things about, and it covers largely the same material, if you're more of a books learner than a videos learner. It's in pseudocode which saves you the stress if you (like me) don't know C++, don't currently want to, and are struggling through C-dialect-heavy graphics resources.
math refresh - 3blue1brown's linear algebra
for a linear algebra refresh - 3blue1brown's linear algebra series is hard to beat.
shader school
A 10-years-but-still-running GLSL shader interactive course. Really really good, and you can still get it running on local! Don't try to get rid of the broken node dependency loops tho that way lies madness. Thank you to a fellow Recurser (you know who you are!) for putting me onto this when I was trying and failing to brute force my way into understanding shaders.
shader toy
A really excellent website to see the bonkers things people can do with shaders and hope one day you too can be that crazy skilled.
learn wgpu
learn wgpu. honestly, this one's probably best if you're coming in with some graphics background. i tried moving to this right after writing the software renderer but found it confusing/buggy in places and entirely copy-this-boilerplate-ey in others. by the end i could change the sea of stone cubes in the tutorial to a sea of dancing kate bushes (see below), but not much else--- everything i'd written felt pretty opaque and difficult to reason about. chris biscardi has a good series walking through most of learn wgpu, but it seems even they bailed before reaching the end lol.
x11 fun
someone linked this fun interactive book-tutorial on the X11 window system in the Recurse chat. It has a bunch of fun demos that helped me understand what aliasing/anti-aliasing are and why they occur, and has a bunch of fun legacy Linux stuff. Shoutout to whoever linked this!
bonus for those who got this far
^taking advice on this one! I think WebGPU can't detect my NVIDIA GPU on hybrid mode, and my laptop doesn't support dedicated mode at the moment. Also getting some "Creating an image from external memory is not supported" console messages? so clearly asset fetching is not working?
^ this is a joke lol